You've got your printer set up and you've made a few prints. Now it's time to go from good prints to great prints. This guide will teach you the essential calibrations, slicer settings, and finishing techniques that will elevate your 3D printing skills.
Key Takeaways
- Calibration (Z-offset and E-steps) solves 90% of all print quality issues before they even start.
- Tuning your Retraction settings is the ultimate secret to eliminating stringing and oozing.
- Advanced slicer features like Ironing and Support Interfaces drastically improve surface finish.
- Proper post-processing (sanding, priming, and gluing) turns a basic plastic print into a professional-grade product.
Part 1: Mastering the Fundamentals (Calibration is Key)
Poor print quality is rarely the fault of the printer itself; it's almost always a calibration issue. If you haven't already, make sure you're comfortable with the concepts in our Beginner's Guide. Mastering these two calibrations will solve 90% of your problems.
A Perfect First Layer is Everything
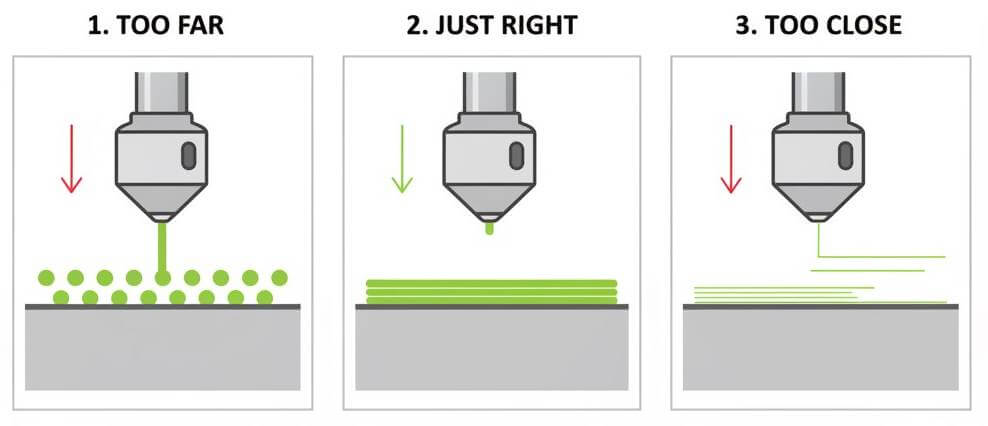
Even with auto-bed leveling, you need to set the "Z-offset." This is the exact distance between the nozzle and the print bed. Your goal is a perfect "squish" on the first layer. The lines of plastic should be slightly flattened and perfectly fused together, not round beads (too far) or so thin they're transparent (too close).
Calibrate Your E-Steps (Extruder Calibration)
Your printer needs to know that when you ask for 100mm of filament, it pushes exactly 100mm. E-step calibration synchronizes the extruder motor with the actual amount of filament being pushed. An uncalibrated extruder can lead to "underextrusion" (gaps in your print) or "overextrusion" (messy, blobby prints). Search for a guide on "E-step calibration" for your specific printer model.
Part 2: Slicer Power-Ups for Better Quality
Your slicer software holds the secrets to print quality. Here are a few settings that can make a huge difference.
| Print Defect | The Solution | Slicer Setting to Tweak |
|---|---|---|
| Stringing / Cobwebs | Pull filament back during travel moves | Increase Retraction Distance & Speed |
| Rough Top Surfaces | Smooth the top layer with a hot nozzle | Enable "Ironing" |
| Ugly Overhangs | Create a dense roof for supports | Enable "Support Interface / Roof" |
| Elephant's Foot | Shrink the first layer slightly | Adjust "Initial Layer Horizontal Expansion" |
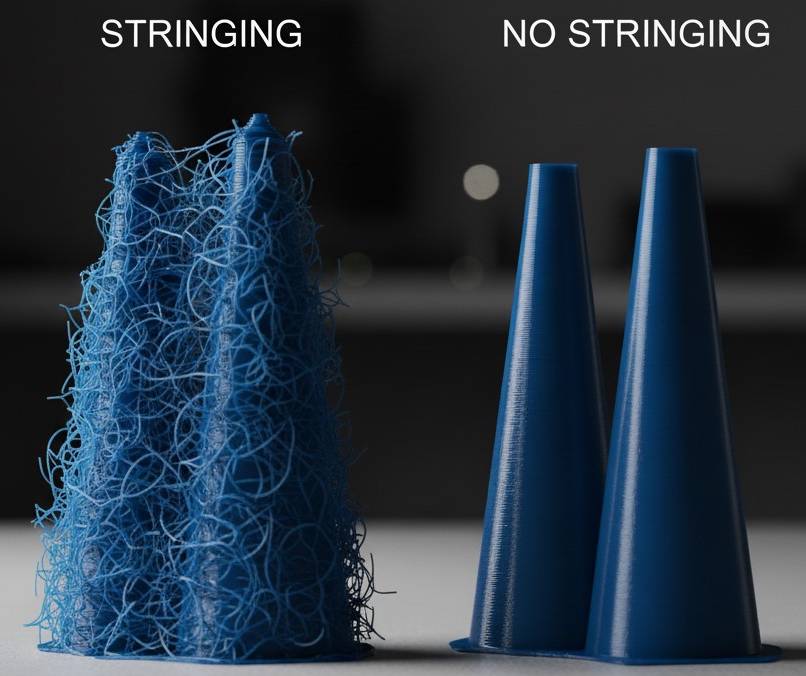
Tuning Retraction to Eliminate Stringing
Stringing (thin hairs of plastic between parts of your model) happens when the nozzle oozes plastic as it travels. "Retraction" is a setting that pulls the filament back slightly before a travel move. By printing a "retraction tower" test model, you can dial in the perfect retraction distance and speed to get clean, string-free prints.
Using "Ironing" for Glass-Smooth Top Surfaces
Tired of seeing lines on the top surface of your prints? Most modern slicers have a feature called "Ironing." When enabled, the hot nozzle will make a final pass over the top layer without extruding much plastic, melting the surface lines together into a smooth, almost injection-molded finish.
Optimizing Your Supports
Supports are necessary, but they can be hard to remove and leave ugly marks. In your slicer's support settings, look for "Support Interface." This creates a dense, solid roof on top of the lattice support, which provides a much cleaner surface for your model to rest on and often makes the supports easier to peel away in one piece.
Perfect prints command premium prices.
Now that your prints look professional, make sure you are charging enough for your time, materials, and machine wear.
Calculate Your Profit MarginPart 3: The Art of Post-Processing (Finishing Your Prints)
A print is rarely finished when it comes off the printer. A little cleanup can make it look professional.
Support Removal
Remove supports carefully using a combination of flush cutters to snip away the bulk and a deburring tool or hobby knife to clean up the contact points. Always cut away from yourself and wear safety glasses.
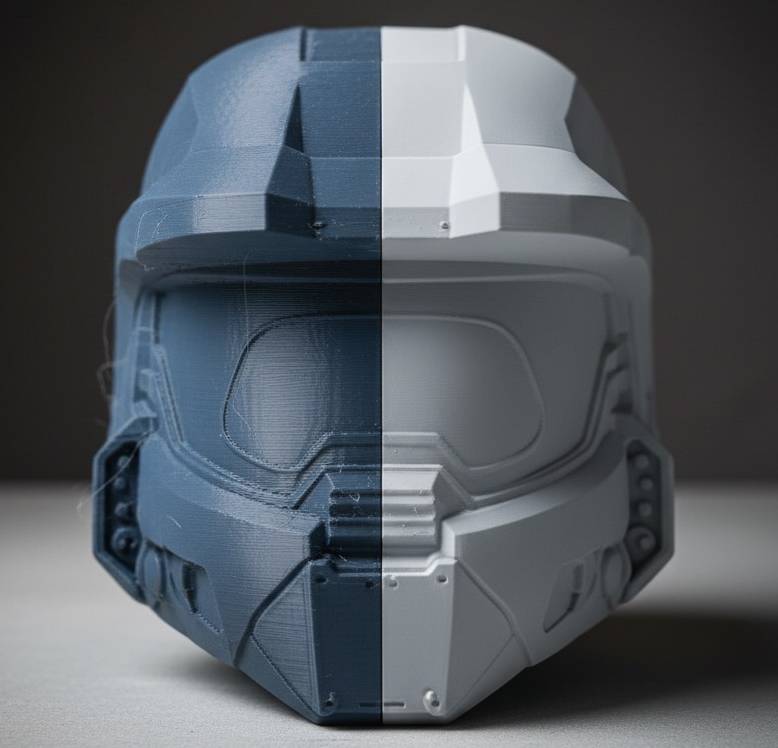
Sanding and Priming for a Perfect Finish
For a truly professional look, you can sand your prints. Start with a low grit sandpaper (like 120) to remove layer lines and work your way up to a fine grit (400 or higher) for a smooth surface. For PLA, wet sanding can help prevent the plastic from melting due to friction. After sanding, apply a coat of automotive "filler primer." This fills in any remaining microscopic layer lines and prepares the surface for painting.
Gluing Parts Together
When printing large models in multiple pieces, the best adhesive is a super glue (Cyanoacrylate) with a "kicker" or accelerator spray. Apply the glue to one piece, spray the kicker on the other, and press them together for an instant, strong bond.